
I was recently tasked with loading Mac OS X on a custom built Intel-based platform. Hackintosh builds have been around for years and until recently was definitely not for the faint of heart. Apple has embraced sufficient hardware vendors that with a modicum of care, building a hackintosh can be accomplished with relative ease. I say “relative ease” as I discovered when I started this task that there is a significant amount of incredibly bad advice out there in the wilds.
To be sure, Apple does not endorse hackintosh builds and it is considered a legal grey area. I am not writing this to recommend one build a hackintosh but to show the interesting learning areas to be gained by building your own computer system. All too often we look at our technology as if it’s a black box. In many ways that is a problem particularly as it relates to security. I believe that the more you know, the better you will be able to debug problems, skirt sketchy security issues, and be comfortable with tech that envelopes all our lives.
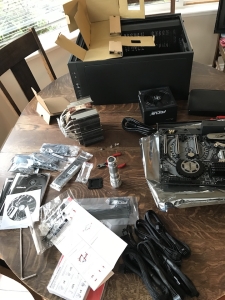
My Build – the Hardware:
- ASRock Z370 Taichi LGA 1151 (300 Series) Intel Z370 HDMI SATA 6Gb/s USB 3.1 ATX Intel Motherboard
- Intel Core i7-8700K Coffee Lake 6-Core 3.7 GHz (4.7 GHz Turbo) LGA 1151 (300 Series)
- MSI Radeon RX 570 DirectX 12 RX 570 ARMOR 8G OC 8GB 256-Bit GDDR5 PCI Express
- SAMSUNG 970 PRO M.2 2280 512GB PCIe Gen3. X4, NVMe 1.3 64L V-NAND 2-bit MLC Internal Solid State Drive (SSD)
- Fractal Design Define R6 Gunmetal Brushed Aluminum/Steel ATX Silent Modular Mid Tower Computer Case
- Seasonic FOCUS Plus Series SSR-850PX 850W 80+ Platinum ATX12V & EPS12V Full Modular 120mm FDB Fan 10 Years …
- CORSAIR Vengeance LPX 32GB (4 x 8GB) 288-Pin DDR4 SDRAM DDR4 3000 (PC4 24000)
- Rosewill RDCR-11004 – Data Hub for 5.25″ Drive Bays
- Noctua NH-D15S, Premium Dual-Tower CPU Cooler with NF-A15 PWM 140mm Fan
- Western Digital Gold 4TB Enterprise Class Hard Disk Drive – 7200 RPM Class SATA 6Gb/s 128MB Cache 3.5 Inch – WD4002FYYZ
- Acer RT280K LED Monitor 4K 28″
In the Beginning:
For my initial build, I used a wired Apple keyboard and a wireless Microsoft mouse. I eventually swapped those devices out and the final build looks slightly different.
I was given references to a very popular hackintosh advice website. I went through the basics and felt like I understood what was needed. The hardware for the most part is compatible. I chose to download and use the recommended prep & installation software which was BIG MISTAKE #1 and caused me quite a few hours of grief. I also plugged in all devices and went full tilt at the install and this was BIG MISTAKE #2. And to round it all out, I went with a 250MB flash drive which was BIG MISTAKE #3. It’s not that all of these are a problem but combined, I found myself flailing and it became obvious I needed to slow down and be more methodical in the process.
Here was my new plan:
- only have the most basic hardware setup;
- learn more about what it means to create a hackintosh;
- go with a minimalist, piece-by-piece installation.
- use a 16GB thumb drive
Working on Success:
Here are the sources I found most useful:
- https://www.reddit.com/r/hackintosh/ – a surprisingly large wealth of information on how to get started, how to debug problems, where to find needed kexts, and the like.
- https://www.insanelymac.com/forum/ – smaller forum but still quite a bit to be gleaned to help with debugging problems.
- https://hackintosher.com/ – smaller still but some great information on using Clover, settings for your config.plist, and more.
After trial and error, I found that the most important bit of software is Clover (EFI bootloader) & the Clover configurator. You can find it in SourceForge and of course, it’s open source. You can find the Clover project here: https://sourceforge.net/projects/cloverefiboot/ There are quite a few links on the SourceForge Clover page to help guide you in the process of learning how to use Clover most effectively. I found that with Clover, I didn’t need 3rd party apps in the process of setting up my hackintosh.
I’m not going to go through the gory details of each keystroke but just put in notes of what was needed. For kexts, I currently have: AppleALC, IntelMausiEthernet, Lilu, VirtualSMC, WhateverGreen. Several other recommended kexts seemed to conflict in my setup. Most of the setup works out of the box but to get the network going, the IntelMausiEthernet kext is required. Lilu & WhateverGreen kexts are for the GPU. I do have an issue in that only half the USB ports are working and I’ll get that resolved at some point. There is one area that I know I’ll never get working and that’s the Intel-based WiFi. There simply is no support (yet) from Apple and no one has written a kext that works. I don’t mind plugging in a cable at this point in time to have network access.
I found the RX570 graphics card worked out of box and in fact, I did find that Intel UHD 630 iGPU which is on the motherboard worked out of box as well. So there are options for me. I do like the RX570 which takes advantage of the 4K monitor I have in place.
Oddities on Install:
Once I got my initial install up and running, I found I had a few issues. First was that there was glitching on the screen. Drag around a window and it left artifacts on the screen. This turned out to be a simple fix by changing the SMBIOS Product Name to iMac 18,1 in Clover Configurator. You can read about this here: https://hackintosher.com/guides/fix-coffee-lake-uhd-630-igpu-from-glitching-hackintosh/ This glitching happened when I was using the Intel UHD 630 iGPU and early on in the setup process. I can’t say for sure if it would have happened with my Radeon RX 570 card but using iMac 18,1 didn’t cause any issues otherwise and so is a safe choice.
My monitor is an Acert RT28K with capability for 4k resolution. Until I installed the RX 570 card, what I saw on the display was quite distorted. Clearly the iGPU is not capable of properly providing the kinds of resolution and display size needed to properly use this monitor. This is a YMMV type comment.
Plugging in my genuine Apple SuperDrive would popup a message saying that the device needed a powered USB port. That also meant I wouldn’t be able to plug my iPhone into a USB port and expect to charge the device. This is problematic. Something to keep in mind is that I used this guide – So You Want a Vanilla Install? (for Mojave) and for the most part the guide keeps it simple. One of the recommended kexts, USBInjectAll.kext, turned out to be the problem. Once I removed that kext and rebooted, my devices are now properly and are recognized under Mojave. This particular kext was never intended for long term use per the developer but to help in determining settings needed for all USB ports. I will readdress this as per my Item #1 in the ToDo list.
What’s Left:
My list to complete:
- get remaining USB ports working
- get keyboard keys for display brightness working
- find way to get macro keys on left of keyboard to be mapped to useful items – without using Razer Synapse
get keyboard keys for sound working- install software (yes an ongoing project)
- prevent sleep when ongoing activity (network, terminal, etc.)
For item #2, I tried the highly recommended NativeDisplayBrightness utility application. You can find tons of links to this project on GitHub and many accolades yet I found it conflicted. With the application running, my computer would not properly exit the screen saver. So I’ll keep looking but to be honest, it’s not that big a deal.
For item #3, many people recommend Karabiner Elements but I found this comment on the forum under GitHub: https://github.com/tekezo/Karabiner-Elements/issues/1684 which in essence points out what could be a very serious security issue with this project. If this post is true, Karabiner Elements is a keylogger of dubious intent. I have chosen to avoid this for now and will look at some of the core aspects of the Karabiner source code to see if I can get the results I’m looking for.
Item #4 for the most part works but not as I’d like it too. I guess I’m lazy in that I expect to hit one key and not two to get the desired effect. Definitely not a high priority at this time.
Item #5 – I want to mention that every bit of software has pretty much worked as expected. All of the major software packages I use in my day-to-day work just fine.
Final Thoughts:
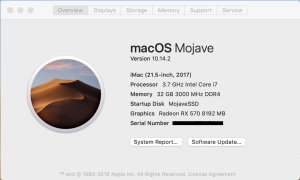
Once installed and the OS upgraded to 10.14.2, everything seems to be working fairly well. Sleep is a problem at the moment as is the mentioned USB port issue. Neither is a showstopper. For gaming, Fortnite works quite well as do other games. The final peripheral setup includes a Logitech G502 Hero gaming mouse, Logitech G933 Artemis Spectrum headphones, Razer Blackwidow Chroma V2 keyboard, and an Xp-Pen Star06 drawing tablet. All of these devices work as expected. The respective drivers and support software loads without any issue at all.
My only beef is with Razer and knowing what I know now, I would have gone for a Logitech keyboard. Razer requires one to log in and use the cloud to store settings. It’s for a keyboard – other manufacturers have no problem storing settings on your system without the intrusive requirement of online. The other problem I have is that Razer hides the fact they are trying to get you to do cryptocurrency mining for them using your resources & electricity all to earn store credit. So if you successfully mine that $4,000 Bitcoin, all you get is pennies a day for the drag on your system that you can turn into maybe a mouse? No thank you.
——–
NOTE: Well my pics are actually better quality than what I see here so time to figure out who is munging those graphics.