I’ve finally had it with long, cold, snowy winters. Packing and moving is a pretty daunting task and I’m happy to say that we survived the ordeal. I do have a few tips though that can help with making that move a less-stressful event. In previous moves, I’ve paid for professional packers and have always been disappointed. Something was always broken or bent and of course they pack EVERYTHING — even when you tell them not to. Seriously — did I want that empty toilet paper roll? So for this move, we decided to pack ourselves and I’m happy to report that what we packed survived just fine. The added bonus of packing yourself is that YOU decide just what you want to move, what to discard, and what to put together in a box. Except for a few last minute errant items, everything was boxed so that we could find it when we wanted and put other boxes into storage without worry of what they contained.
Before you get started on packing up the house, think about how much of life’s detritus you really want to bring along. I started about a month before the move by working through closets & storage areas. Layer of dust? Probably a good indication that I don’t need the items. From there it’s a matter of determining where it should go – in a yard sale, donated to a local charity or sent straight to the dump. For those of you who think that all of your cherished belongings are worthy of at a minimum a trip to a charity shop, think again. Places like the Goodwill Stores spend thousands upon thousands to cart to the dump what you should have sent there yourself. My rule of thumb – if I can’t sell it at a yard sale, it’s dump-worthy. By sell it, I mean having a purchaser for that item and not just putting it out in the hopes that the item(s) sell. Do us all a favor and send your unwanted items to the appropriate place and it is OK to send Uncle Bob’s handmade, odd-sized, carpeted box to the dump.

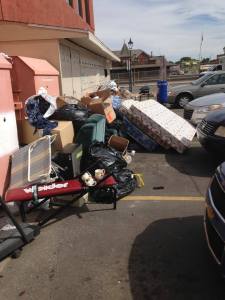
Seriously? This facility has signs posted EVERYWHERE about not dumping and yet this is what can be found Monday mornings.
OK so now off that soap box and on to the next step. Consider getting a couple of larger boxes to help with the sorting. If you’re going to donate to a thrift shop, plan on going often and during regular business hours. This helps to keep you moving on the moving plan and helps the thrift shop keep costs in line. Once I got into a rhythm of sorting, I would go by the local charity thrift store 2-3 times a week and I regularly loaded up the trashcan with junk. It’s amazing how we can accumulate so much stuff over the years. Now as I was sifting and sorting, I also considered what I wanted to pack together. I would run from room to room to make sure all games were together, common books were together, winter clothes, etc. As I filled a moving box, I made sure that similar items were together, properly packed, labeled and set aside.
Tip – you don’t have to think one box at a time. I had half a dozen boxes partially full as I worked from room to room. Organizing your life items will make unpacking so much easier. Hiring someone to pack is one thing but in the end, you still have to unpack. Professional packers do just that – pack. They won’t know that you have half of the works of John Steinbeck in one cabinet and the rest in another room. You’ll notice I mention this often but it bears repeating — by packing yourself, you can organize your life and make unpacking easier.
Supplies are key and you’ll want to have a large quantity on hand. The essentials are: boxes, packing paper, tape, shrink wrap, bubble wrap, and a good permanent marker.
Boxes
This can definitely make or break your packing job. We found that the boxes from our professional moving company were inferior to what you could find elsewhere. In order of quality:
- U-Haul boxes — these are the best. Great sizes and you can buy in bulk for a discount. If you buy too many, take the excess back for a refund. I never thought I’d recommend items from U-Haul but there you go. Now the tape that our local retailer sold was awful so we stuck to the packing paper & boxes.
- Home Depot — the Heavy Duty boxes are double thick just like a good dish pack box. I’m not so fond of the Home Depot wardrobe boxes or regular thickness boxes. The Heavy Duty boxes were perfect for Grandma’s china.
- Professional moving company (United Van Lines) — great wardrobes but the other boxes were not of the same quality.
- Home Depot — regular boxes. Fairly good except the wardrobe boxes were a disappointment.
- Dollar Store — you’d be surprised at what you can find at one of the larger chain dollar stores have to offer but it’s very limited for size and the quality is best if you’re going to be packing small boxes into larger boxes. YMMV
Note: Just say ‘NO’ to liquor store, grocery store, and similar boxes. Very hard to pack into and with varying sizes makes moving day a nightmare. Good boxes make for a good move plus you can break the boxes down and reuse them later. Ours are now put away for the next move.
Packing Paper
Another area you don’t want to skimp on. Yes you can use old newspaper but the ink bleeds and the pages can vary in size. Again this is where U-Haul had the best. The packing paper sold in bulk is thick enough to not tear at the slightest touch, is sized well even for odd size items, and is acid free. Our mover sold similar paper as does stores like Home Depot. I just found that the Home Depot packing paper was smaller in size and at times awkward to use for larger items like picture frames.
Tape
You don’t want Grandma’s china spilling out of the box due to weak tape. Take the time to find a good tape that is easy to use & strong enough to stand up to some level of punishment. Our moving company sold a fabulous tape that was thin but strong. Some of the commercial tapes shred when trying to cut or they don’t hold for a very long time. That clear packing tape from Staples and other office supply stores? Not very good as you’ll find the tape coming back up in a short amount of time. In this instance, I didn’t like U-Haul’s tape as it was very difficult to work with. While you’re out getting tape, get a proper tape gun. Here’s a video on how to load a tape gun:
The tape that the pro’s use is a high adhesive, low static, polypropylene tape. Worth every penny.
The Packing
There are a lot of videos both good and bad on YouTube to help you learn how to properly tape and pack your boxes. I viewed several until I felt comfortable with the process and decided to vary somewhat when the advice was either too skimpy or too overly processed. I have Grandma’s china and that worried me the most about packing. I watched the United Van Lines video on how to pack a kitchen and found it useful except that sometimes they recommend too much paper. Don’t skimp on the important items but when you find that you’re only putting a couple of items into each box, it might be time to reconsider how much paper is being used. This is where I used what I considered good common sense and took key tips from the videos to make my packing easier.
I didn’t find this video until after I’d packed all the china but that’s ok. His advice is sound though I prefer to work in batches of 4 plates at a time and I used 2-3 sheets per plate. You have to decide what your comfort level is and how valuable you consider the dishes you’re packing. For me, I wanted to make sure that Grandma’s china survived until I pass it down to my daughters hence the 2-3 sheets and only working with 4 plates at a time.
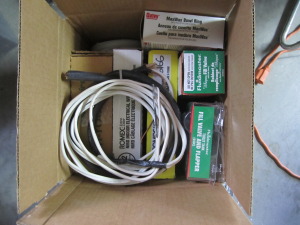
I found that I wasn’t always as descriptive as I should have been when writing on the boxes. My husband was packing his garage and he decided to take pictures of the contents of his boxes. This proved very helpful when looking for key items that hadn’t been unpacked yet. The garage and storage rooms are fraught with odd items and the pictures helped to determine what truly was in each box. Here’s a sample of one of his garage boxes:
Packing Tips
There are tons of videos, blog posts, and websites with packing tips. Yup — I just added another to the mix. What I have in my tips are what I consider the real gems besides the common ones of pack heaviest on the bottom.
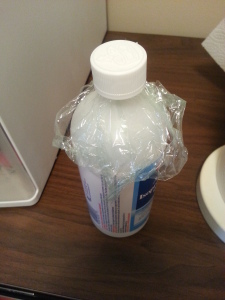
- Liquids – don’t be afraid but also don’t pack all into a box lined with a garbage bag hoping for the best. If something happens, you’ll have a bag full of “soup” to deal with that hopefully didn’t leak over other boxes. Best tip ever – take off the cap, cover the opening with a piece of plastic wrap and put the cap back on. If you’re concerned about leakage (don’t!) then you can mummify in shrink wrap. You can’t do the same for spray bottles so I just made sure the nozzle was turned to ‘OFF’ and then wrapped securely in shrink wrap.

- Sprayers & some caps are difficult to put plastic wrap under. Just make sure nozzles are “OFF” and then “mummify” the item in shrink wrap.
- Shrink Wrap – is useful for more than just wrapping furniture. Places that sell packing supplies will generally sell handheld shrink wrap. This is useful for say wrapping up desksets, handfuls of pencils, and other odd items.
- Take Pictures – taking pictures before you seal a box will help you to find items later on. Very useful when you have mixed item boxes.
- Paper Folder – gather up important paperwork and set aside. This will be an ongoing process so keep your folder in an accessible place. Things like birth certificates, driving records, etc. will need to be in this folder. I used a large, clear portfolio and just kept dumping anything that resembled necessary paperwork and included the checkbook & other financial instruments.
- Write BIG – Big, bold, legible writing on the box is your best bet that the mover might actually read it and follow instructions. No guarantees here as I found my well marked ‘FRAGILE’ boxes were at the bottom of a stack of heavier boxes. Thank goodness I packed the items well and made sure the boxes were square & tight.
- It’s OK to Get Help – I found the kitchen the hardest for me to handle given all the other spaces that needed sifting, sorting and packing. I hired a small, local packing company to come in and do the kitchen. This resolved quite a bit of stress for me.
Conclusion
We haven’t finished packing yet but we’re closing in on the end. I’m proud to say that our “stuff” survived quite well. I’m also happy to report that no empty toilet paper rolls came along in the move.


